Want a faster website and better Core Web Vitals? Installing a reliable WordPress performance plugin for caching and asset optimization is the first step to getting started. This short guide walks you through the plugin installation steps so you can move from “downloaded zip” to “ready to tune” without guesswork.
Whether you prefer the dashboard or FTP, the goal is the same: a smooth WordPress speed plugin setup that leaves your site.
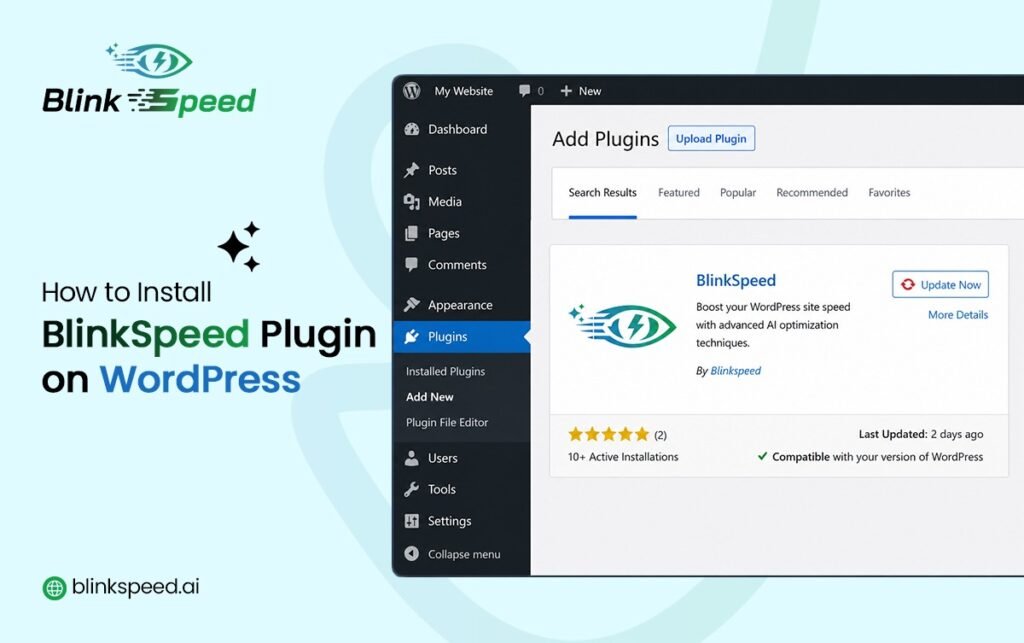
Before you start you need: BlinkSpeed Installation Guide
Your host should meet the WordPress speed plugin setup:
- WP 5.0+: If your site isn’t ancient, you’re likely good to go.
- PHP8+: Stick with at least 7.4, but grab PHP 8.x if you can.
- XML & DOM: These extensions must be enabled to handle data and layout.
- GD Library: This is the engine used for processing and resizing images.
If any of these are missing, WordPress may show an admin notice after you install. In that case, ask your host to enable missing pieces, no amount of clicking inside the plugin can fix server gaps.
BlinkSpeed Plugin Installation steps From WordPress Dashboard (recommended)
This is the fastest method for most users and fits well into any BlinkSpeed installation guide.
Step 1: Get the plugin package
Download the official BlinkSpeed .zip file from your purchase or account area. Keep it as a zip, WordPress expects a single archive for “Upload Plugin,” not a folder you dragged out of the zip on your computer.
Safari tip: Some Mac setups auto-expand zips. If your file becomes a folder, either zip that folder again or turn off “Open safe files after downloading” in Safari settings so download stays a .zip.
Step 2: Upload in WordPress
- Log in to wp-admin.
- Go to Plugins → Add New.
- Click Upload Plugin.
- Choose your blinkspeed.zip and click Install Now.
- When the installation finished, click Activate.
That’s the server-side part finished, the plugin folder is in wp-content/plugins/, so WordPress can load it like your other plugins.
Step 3: Open BlinkSpeed
- Access the Dashboard: Open Blinkspeed from the Admin Menu.
- Keep it Simple: Try not to enable every option the second you install it..
- Verify the Load: Make sure everything displays correctly without permission errors or broken pages.
- Go time: If the interface looks solid, you can start optimizing.
Manually Activate BlinkSpeed with FTP
Sometimes file size limits, security rules, or flaky connections block dashboard uploads. Manual upload, the end result is identical it just involves a few extra steps during the setup process:
- Unzip locally: Open the package on your computer until you find the blinkspeed folder.
- Connect to server: Log in with FileZilla or host’s file manager.
- Upload: Move the folder into /wp-content/plugins/.
- Activate: Go to Plugins in your dashboard and click Activate.
After it’s live, the workflow matches the standard installation. Open the new menu item to get a feel for the layout; this helps you spot exactly where the HTML caching, asset optimization (CSS/JS), and image settings are located for when you’re ready to fine-tune the performance.
Right after activation: check WordPress Performance Plugin
- No scary errors on the BlinkSpeed screen (especially folder permission messages for cache paths).
- Front end still loads in a private/incognito window good for seeing the site as most visitors do.
- Back up before you turn on aggressive options. A backup plugin or host snapshots pair well with any WordPress performance plugin rollout.
BlinkSpeed can create cache and optimization directories under your content path; if the plugin warns it cannot write somewhere, fix permissions or the custom cache path in settings with your host’s help.
What happens on multisite?
If you run a WordPress multisite network, installation is still “upload + activate,” but where you activate (network vs individual site) and who sees the menu can follow network rules. Network admins often get a network-level menu; per-site managers may need the right capability. If your network uses “manage each site separately,” some tabs may hide on the network screen, your super-admin can align that with how you want sites governed.
You installed it, what is next?
Installation is only the doorway. When you are ready, walk through:
- Turning optimization on or off globally.
- HTML cache basics (expiry, how cache is served).
- CSS/JS and image toggles that match your theme.
Do one change in settings at a time. If anything goes side ways, you won’t be left wondering which checkbox was the culprit, you can undo the last change and move on.
FAQs
Do I need a license to install the plugin?
You can install BlinkSpeed and explore many features without a paid license; advanced cloud-backed options are for homepage-only until a key is added.
The upload says “package could not be installed.” What should I try?
Usually zips are corrupted, unzipped too early, or over the host’s upload limit. Re-download the zip, confirm it is not auto-expanded, try FTP upload, or ask the host to raise file size temporarily.
Will installing BlinkSpeed break my site?
A plain install and activate BlinkSpeed step should not change the front end by itself until you enable optimizations and caching. Still, use a staging copy or a backup when you start toggling aggressive settings.
Is BlinkSpeed only for big sites?
No. Small blogs and shops benefit too; the difference is how much traffic you push through cache and how carefully you exclude checkout, cart, or member areas if you use them.
Close thought:
Upload the raw zip file directly to dashboard, no need to extract it first. Just make sure PHP settings are current, then activate BlinkSpeed and check your admin sidebar for the new menu. That is a complete first lap for anyone adding this WordPress performance plugin and a calm start to a faster site.